 en-gb
en-gb
 Deutsch
  Español
  Français
  Italiano


Desktop Memory Installation Guide
Installing components in computers is really a lot easier than you might think, upgrading or installing new memory is probably the easiest component to install. Really building or upgrading a desktop's hardware is just lego for grown ups, at least when you know what goes where.
There are many, many tutorials and videos around the web explaining how to install RAM into your desktop, here's ours.
Step 1: Power off and ground yourself
Turn off your computer as you would normally, then switch off the power supply - there is a switch at the back of your PC where the mains power cable plugs in. You may leave the power cable in, in fact if its convenient we advise that you leave it plugged in but switched off as it will help ground your PC.
Grounding yourself and your PC
It is very important you ground yourself and ensure your PC is grounded or you risk damaging components with small electrical static charges. The best way to do this is to use an anti-static wrist band or an anti-static mat, you should ensure your PC is on a conductive surface too - any wooden or metal table or just the floor will do, again leaving the mains cable in (but switch power switch off) has this effect also. If you don't have an anti-static strap or mat the next best thing is to just ensure your not wearing insulated shoes and touch something grounded before you handle the RAM or touch anything inside your PC. Just touch something metal and attached to your floor or wall, like a radiator, door handle, or metal desk or chair legs.
Step 2: Open your desktop
Remove the side panel of you computer case, normally there will be 2 screws on the back, side, holding it in place, then the panel will just slide out.
Step 3: Locate your memory sockets
Your RAM sockets or dimm slots are long plastic sockets normally with clips at either end. They are normally located near the CPU which will be covered by a fan and heatsink or a plastic air vent cover. You probably already have some memory installed in the dimm slots - if you need to remove them, simply pop open the clips at either end and gently pull them out.
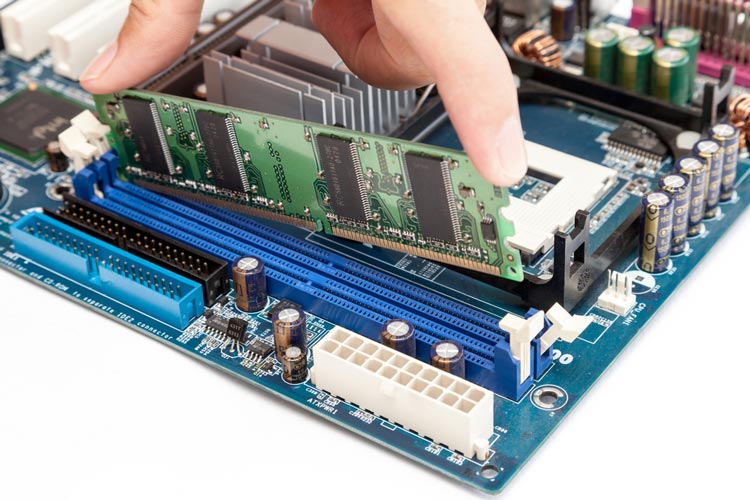
Step 4: Install your RAM
When handling your memory module you should be careful to only touch the edges, try not to touch the chips on the module.
Normally there are clip(s) at either end of the RAM socket which need to be unclipped. Align the metal connectors of the memory module with the metal connectors of the socket on the motherboard. Be sure that the RAM is aligned properly and that all pins line up correctly. Slot your RAM module into the slot and firmly push down - not too hard - applying pressure at either end of the module. You should hear the clip(s) click into place. If the dimm does not fit, turn it around as dimms are keyed and will only fit in one way round.
Step 5: Finish up and testing
Replace the computer cover and re-attach cables and peripherals. Turn on your PC, some computers will require you to update the computers memory configuration outlined in the computer users manual.
Once you have booted into windows, you may check your current installed memory by going to: Start > Control Panel > System and Security > View amount of RAM and processor speed.
If you cannot see all of the memory installed then you should read our memory trouble shooting guide.